
How To Fix Your iSUP Valve
There's nothing that will fill you with dread faster than seeing air bubbles and hearing the hiss of air escaping from your inflatable paddle board while you're out paddling around. Except seeing a great white tailing you; that would be worse.
The good news is that inflatable paddleboard repair is so much easier than fixing dings on a hard paddle board. We'll review the repair process here and explain different techniques for locating leaks and applying patches to get rid of those pesky leaks once and for all. Don't fret- small holes are an easy fix.
Key Highlights
- Identifying the Leak: Start by inflating your SUP and applying a soapy water solution to spot persistent air bubbles indicating leaks.
- Preparing the Surface: Thoroughly dry and clean the leak area with rubbing alcohol before any patch application.
- Patch Application: Apply PVC glue to both the patch and the SUP, press firmly to adhere without gaps, and allow to cure overnight for best results.
- Using Self-stick Patches: For quick, minor repairs, self-stick patches offer a convenient, no-mess solution.
- Valve Maintenance: Tighten the valve with the included wrench to prevent air from escaping. Regular checks ensure the valve remains tight and functional.
- Post-Repair Testing: After repairs, re-inflate and recheck the area with soapy water to confirm the leak is sealed.
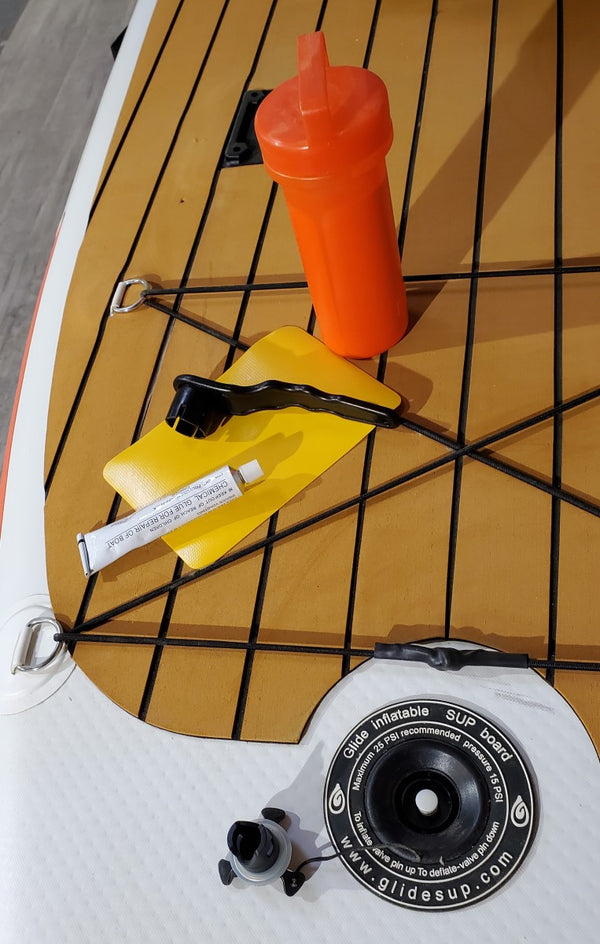
At Glide, we understand that your inflatable SUP is more than just a piece of equipment—it's your gateway to adventure on the water. That's why we've included a repair kit with every Glide inflatable SUP purchase. But if you've misplaced yours or are in need of a refresher on how to use it, don't worry! Repairing your SUP is straightforward and affordable, with PVC patches and glue usually costing between $10-$20.

Finding and Preparing for the Repair
The first step in any repair is locating the leak. This can sometimes be a challenge, but an effective method is to inflate your SUP to at least 1 PSI and then gently pour water mixed with a little dishwashing detergent over it. Look for persistent bubbles, which indicate a leak. Once found, dry the area thoroughly and clean it with rubbing alcohol. If the damage is near a critical feature like a D-ring or pad, consider how the patch's shape might need to adapt while aiming for a round patch when possible.
Applying the Patch
With your SUP deflated and the area prepped, apply a thin layer of PVC glue to both the patch and the board. Press them together firmly, ensuring no edges are left unattached. Wiping away excess glue will keep the repair area clean and reduce dirt accumulation. It's crucial to allow the patch to cure properly, typically overnight, to ensure a strong bond.
The Convenience of Self-stick Patches
In addition to traditional patches, we recommend keeping self-stick patches on hand. These patches, which don't require glue, offer a quick and mess-free solution for minor repairs. Simply peel and stick for an instant seal.
Checking the Repair and Addressing Valve Leaks
After allowing adequate time for the glue to cure, re-inflate your SUP and reapply the soapy water mixture to check for leaks. While patch failures are rare, they can happen, and a secondary patch might be necessary. Valve leaks, often due to loosening over time, are another common issue. Thankfully, they're easily fixed with the valve wrench included in your repair kit. A snug tightening of the valve should resolve most air escape problems.
Glide's Commitment to Your Paddleboarding Experience

Our goal at Glide is not just to provide you with high-quality SUPs and accessories but also to ensure you have the knowledge and tools to keep your gear in top condition. If you encounter issues with your inflatable SUP or have questions about maintenance and repair, we're here to help. Our Youtube Channel and blog are great resources for tutorials and tips, and our customer service team is just a call or email away.
Embrace the water with confidence, knowing that Glide is with you every paddle of the way. For any questions, reach out to us at 888-927-9405 or info@glidesup.com. Let's keep your adventures on the water seamless and enjoyable!
An Inflatable SUP Repair Kit is Inexpensive & Easy to Use
While every Glide inflatable SUP comes with a repair kit included, you might have misplaced or forgotten yours. Don't worry, PVC patches and glues don't cost much money- they'll usually only cost about $10-$20. Each Glide inflatable paddleboard repair kit contains glue, PVC patches, and a valve wrench.
Related Topics
Things to Consider When Buying a SUP
Improving Fitness on Paddle Board
Can I Leave My Paddle Board Inflated?
