


How To Fix Your iSUP Valve
<script src="https://cdnjs.cloudflare.com/ajax/libs/tiny-slider/2.9.4/min/tiny-slider.js" defer></script>
<script src="https://d2xvgzwm836rzd.cloudfront.net/bloggle-article-min.js" defer></script>
<link rel="stylesheet" href="https://cdnjs.cloudflare.com/ajax/libs/tiny-slider/2.9.4/tiny-slider.css">
<div id="bloggy--article">
  <link href="https://d2xvgzwm836rzd.cloudfront.net/blog_styles--glide-sup.min.css?v=1763574084463" type="text/css" rel="stylesheet">
Fixing an inflatable SUP valve or patching a leak is easier than most paddlers expect.
By using simple tools like soapy water, PVC patches, and the valve wrench included in your repair kit, you can quickly diagnose and repair most air leaks.
Start by inflating your board and checking for bubbles to locate leaks.
Clean and prep the area, apply glue to both surfaces, press firmly, and let the patch cure overnight.
For fast fixes, self-adhesive patches work well on minor damage.
Valve leaks are usually resolved with a quick tightening using the repair-kit wrench.
With a little knowledge and a few inexpensive materials, you can keep your inflatable SUP performing like new.
Glide boards are built to be durable—these simple steps help make sure your adventures stay uninterrupted.
Table of contents
<div id="1763509087666" class="bggle--block bggle_text margin_vertical--medium     margin-top_none  " section-id="1763509087666">
  <h3>Key Highlights</h3>
Learn how to quickly find leaks in your inflatable SUP using soapy water and low pressure.
Step-by-step instructions to patch PVC damage with glue or self-stick patches.
Simple way to tighten a loose iSUP valve using the valve wrench from your repair kit.
Understand when a quick fix is enough and when a more permanent patch is needed.
Keep your Glide inflatable SUP adventure-ready with inexpensive, easy DIY repairs.
        <p class="bloggle_product--title undefined"></p>
        <div class="fd--row jc--center">
          <div class="fd--row bggle--compare">
            <span class="bloggle_product--price-currency undefined"></span>
            <span class="bloggle_product--compare-at-price undefined "></span>
          </div>
          <div class="fd--row bggle--price ">
            <span class="bloggle_product--price-currency undefined"></span>
            <span class="bloggle_product--price undefined "></span>
          </div>
        </div>
      </div>
      <button style="margin-top: auto;" class="button--1636212963117 m--auto">See Product</button>
    </a>
  </div>
  </div>
  <div class="bggle_nav--slider">
  </div>
</div>
Let's Learn How to Fix your iSUP Valve
Let's Learn How to Fix your iSUP Valve
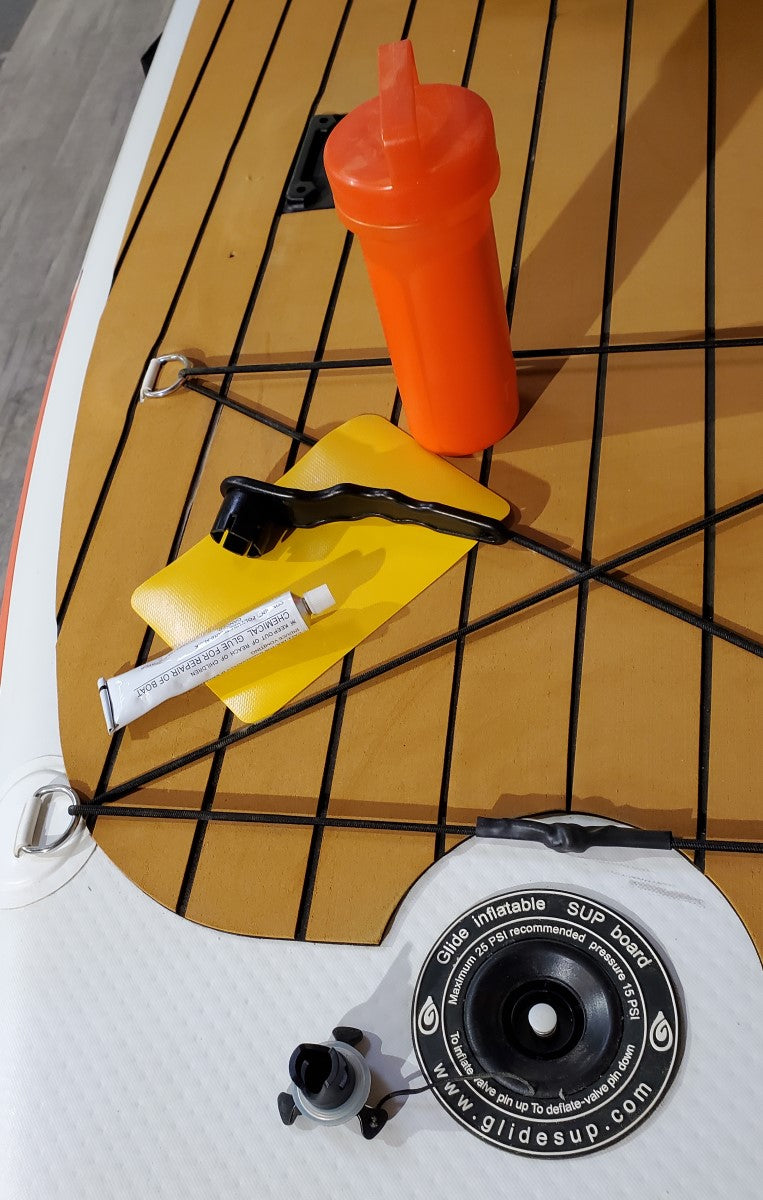
At Glide, we understand that your inflatable SUP is more than just a piece of equipment—it's your gateway to adventure on the water. That's why we've included a repair kit with every Glide inflatable SUP purchase. But if you've misplaced yours or are in need of a refresher on how to use it, don't worry! Repairing your SUP is straightforward and affordable, with PVC patches and glue usually costing between $10-$20.
Finding and Preparing for the Repair
The first step in any repair is locating the leak. This can sometimes be a challenge, but an effective method is to inflate your SUP to at least 1 PSI and then gently pour water mixed with a little dishwashing detergent over it. Look for persistent bubbles, which indicate a leak. Once found, dry the area thoroughly and clean it with rubbing alcohol. If the damage is near a critical feature like a D-ring or pad, consider how the patch's shape might need to adapt while aiming for a round patch when possible.
Applying the Patch
With your SUP deflated and the area prepped, apply a thin layer of PVC glue to both the patch and the board. Press them together firmly, ensuring no edges are left unattached. Wiping away excess glue will keep the repair area clean and reduce dirt accumulation. It's crucial to allow the patch to cure properly, typically overnight, to ensure a strong bond.
The Convenience of Self-stick Patches
In addition to traditional patches, we recommend keeping self-stick patches on hand. These patches, which don't require glue, offer a quick and mess-free solution for minor repairs. Simply peel and stick for an instant seal.

Checking the Repair and Addressing Valve Leaks
After allowing adequate time for the glue to cure, re-inflate your SUP and reapply the soapy water mixture to check for leaks. While patch failures are rare, they can happen, and a secondary patch might be necessary. Valve leaks, often due to loosening over time, are another common issue. Thankfully, they're easily fixed with the valve wrench included in your repair kit. A snug tightening of the valve should resolve most air escape problems.
Glide's Commitment to Your Paddleboarding Experience
Our goal at Glide is not just to provide you with high-quality SUPs and accessories but also to ensure you have the knowledge and tools to keep your gear in top condition. If you encounter issues with your inflatable SUP or have questions about maintenance and repair, we're here to help. Our Youtube Channel and blog are great resources for tutorials and tips, and our customer service team is just a call or email away.
Embrace the water with confidence, knowing that Glide is with you every paddle of the way. For any questions, reach out to us at 888-927-9405 or
info@glidesup.com. Let's keep your adventures on the water seamless and enjoyable!
<img class="lazybloggle blog__img  m--auto" section-image-id-1="1763508895320" data-sizes="auto" data-src="https://cdn.shopify.com/s/files/1/0309/9257/files/reverse-sweep.jpg?v=1760122828" data-srcset="https://cdn.shopify.com/s/files/1/0309/9257/files/reverse-sweep_1800x.jpg?v=1760122828 1800w, https://cdn.shopify.com/s/files/1/0309/9257/files/reverse-sweep_1600x.jpg?v=1760122828 1600w, https://cdn.shopify.com/s/files/1/0309/9257/files/reverse-sweep_1400x.jpg?v=1760122828 1400w, https://cdn.shopify.com/s/files/1/0309/9257/files/reverse-sweep_1200x.jpg?v=1760122828 1200w, https://cdn.shopify.com/s/files/1/0309/9257/files/reverse-sweep_1000x.jpg?v=1760122828 1000w, https://cdn.shopify.com/s/files/1/0309/9257/files/reverse-sweep_800x.jpg?v=1760122828 800w, https://cdn.shopify.com/s/files/1/0309/9257/files/reverse-sweep_600x.jpg?v=1760122828 600w, https://cdn.shopify.com/s/files/1/0309/9257/files/reverse-sweep_400x.jpg?v=1760122828 400w">


<div class="bggle_image-source" source="1" section-id="1763508895320">on an inflatable paddle board</div>
</div>
An Inflatable SUP Repair Kit is Inexpensive & Easy to Use
While every Glide inflatable SUP comes with a repair kit included, you might have misplaced or forgotten yours. Don't worry, PVC patches and glues don't cost much money- they'll usually only cost about $10-$20. Each Glide inflatable paddleboard repair kit contains glue, PVC patches, and a valve wrench. Hopefully, this article on how to fix your iSUP valve will stick in your mind, so that you check the valve first before looking for a leak.
Quick Repair Steps (Process Bullets)
Inflate your SUP slightly and use soapy water to spot bubbles and locate leaks.
Mark and dry the area, then clean it thoroughly with rubbing alcohol.
Apply PVC glue to both the board and patch, wait briefly, then press firmly together.
Let the patch cure overnight before reinflating to full pressure.
For valve leaks, insert the valve wrench and snug the valve until air stops escaping.

  </div>
    <div class="bggle_text--container" section-text-id="text-1763509558811">
      <p class=" bggle-font " style="font-weight: 700; ">Joe Culbertson</p>
      <div style=""> <p>Avid paddle boarder and mountain biker and head of customer service at Glide.</p> </div>

    </div>
</div>
FAQs
          <div class="flex fd--column faq--container">
            <h3 class="bggle--question undefined bold">
Why is my inflatable SUP losing air?
Most air loss comes from a slow leak, a loosened valve, or a small puncture. Luckily, all three are easy DIY fixes using your SUP repair kit and soapy water to locate the issue.
          <div class="flex fd--column faq--container">
            <h3 class="bggle--question undefined bold">
How do I know if the valve is the problem?
If bubbles appear around the valve when you apply soapy water, the valve likely needs tightening. Use the valve wrench from your repair kit and give it a firm—but not aggressive—twist.
          <div class="flex fd--column faq--container">
            <h3 class="bggle--question undefined bold">
How tight should the valve be?
Hand-tight isn’t enough. Use your valve wrench and snug it down until it no longer wiggles. Over-tightening isn’t common, but avoid forcing it beyond resistance.
          <div class="flex fd--column faq--container">
            <h3 class="bggle--question undefined bold">
What kind of glue should I use for patching my inflatable SUP?
Use PVC-specific adhesive only. General adhesives won’t bond properly and may fail. Glide repair kits include the correct glue, but any high-quality PVC glue works.
          <div class="flex fd--column faq--container">
            <h3 class="bggle--question undefined bold">
How long should my patch cure before reinflating?
Ideally, let the patch cure overnight (8–12 hours). Faster cures are possible, but allowing full curing ensures the strongest bond and longest-lasting repair.
          <div class="flex fd--column faq--container">
            <h3 class="bggle--question undefined bold">
Can I use self-adhesive patches instead of glue?
Yes—self-stick patches are great for quick, temporary fixes. For long-term repairs, glued PVC patches are stronger and more durable.
          <div class="flex fd--column faq--container">
            <h3 class="bggle--question undefined bold">
What if my patch still leaks after curing?
It’s rare, but you may need to apply a second patch or replace the first. Re-clean, reapply glue, and use a slightly larger patch for better coverage.
          <div class="flex fd--column faq--container">
            <h3 class="bggle--question undefined bold">
Why are Glide inflatable SUPs easier to repair than cheaper Amazon boards?
Glide uses higher-grade PVC and heat-fused construction, which bonds better with PVC adhesives and self-stick patches. Many cheap Amazon boards use thin, low-quality PVC that delaminates or doesn’t hold glue well.
          <div class="flex fd--column faq--container">
            <h3 class="bggle--question undefined bold">
Do I need professional repair for a leaking valve?
Almost never. Valve tightening fixes 95% of valve leaks. Only damaged valve housings require professional service—and Glide can help if that happens.
          <div class="flex fd--column faq--container">
            <h3 class="bggle--question undefined bold">
What should I do if I can’t find the leak?
Inflate your SUP slightly above normal PSI, use soapy water generously, and check seams, rails, and around the fin box. Stubborn leaks are usually valve-based.
</div>
  <div class="bggle--slider-blog" section-id="1763509681715">
    <div class="bggle_blog-post-container">

     <a class="bggle_blog-post-url" href="/blogs/inflatable-paddle-boards/how-long-do-inflatable-paddle-boards-last-what-to-expect-and-how-to-extend-the-life-of-yours">
        <img class="bggle_blog-post-image lazybloggle" style="height: 200px;" src="https://cdn.shopify.com/s/files/1/0309/9257/files/img-1756417116369_600x_82489844-c479-4f47-856f-89fa60c7b924_550x.jpg?v=1763509692" alt="inflatable paddle board">
        <p class="bggle_blog-post-title ">How Long Do Inflatable Paddle Boards Last? What to Expect and How to Extend the Life of Yours</p>

  <button class="bggle_blog-post-button mr--auto button--1636212963117">
    Read more
  </button>
     </a>
     </div>
     <a class="bggle_blog-post-url" href="/blogs/expert-advice/beginner-paddle-board-mistakes-to-avoid-and-how-to-fix-them">
        <img class="bggle_blog-post-image lazybloggle" style="height: 200px;" src="https://cdn.shopify.com/s/files/1/0309/9257/files/img-1753729735736_600x_07573439-f327-4800-9e90-70c1dc1a86a0_550x.jpg?v=1763509704" alt="woman falling from paddle board">
        <p class="bggle_blog-post-title ">Beginner Paddle Board Mistakes to Avoid (And How to Fix Them)</p>

  <button class="bggle_blog-post-button mr--auto button--1636212963117">
    Read more
  </button>
     </a>
     </div>
     <a class="bggle_blog-post-url" href="/blogs/expert-advice/how-to-paddle-board-transportation">
        <img class="bggle_blog-post-image lazybloggle" style="height: 200px;" src="https://cdn.shopify.com/s/files/1/0309/9257/files/img-1755729155717_600x_bc17ca68-6300-4261-a99c-94e07407f744_550x.jpg?v=1763509712" alt="paddle board against a jeep">
        <p class="bggle_blog-post-title ">How to: Paddle Board Transportation</p>

  <button class="bggle_blog-post-button mr--auto button--1636212963117">
    Read more
  </button>
     </a>
     </div>
  </div>
</div>
<script type="text/javascript" section-id="1763509681715" slider-script>
  window.sliderConfig1763509681715 = function() {
    var numberSlides = document.querySelectorAll(".bggle--slider-blog[section-id='1763509681715'] .bggle_blog-post-container");
    if (numberSlides.length > 0) {
      window.slider1763509681715 = tns({
        container: '.bggle--slider-blog[section-id="1763509681715"]',
        items: 1,
        slideBy: 'page',
        autoplay: true,
        gutter: 20,
        navAsThumbnails: false,
        navPosition: "bottom",
        arrowKeys: true,
        autoplayButton: false,
        autoplayButtonOutput: false,
        mouseDrag: true,
        autoplay: false,
        responsive: {
            768: {
              items: 2
            },
            1025: {
              items: 2
            }
          }
      });
    }
  };

  document.addEventListener('init-slider-1763509681715', window.sliderConfig1763509681715)
</script><div id="1763509730961" class="bggle_video bggle--block flex jc--flex-start text__center  margin_vertical--medium    margin-top_none  " section-id="1763509730961">
    <div class="bggle--youtube-container">
      <iframe class="bggle--youtube-video" src="https://www.youtube.com/embed/9MxqSw4Exr0" title="YouTube video player" frameborder="0" autoplay="false" allow="accelerometer; clipboard-write; encrypted-media; gyroscope; picture-in-picture" allowfullscreen></iframe>
    </div>
  </div>
</div>


Paddle Board Tips & Updates

