How to Inflate (and Deflate) an Inflatable Paddle Board
Step-by-step guide to inflating and deflating your inflatable paddle board using a hand or electric pump, with tips to protect your SUP and save energy.
Inflating your inflatable paddle board might look simple, but doing it correctly makes a big difference in performance and longevity.
Whether you use a hand pump or an electric one, the key steps are the same—set up on a smooth surface, secure your valve in the closed position, and inflate to the correct PSI.
This guide covers every step of inflation, deflation, and common troubleshooting tips so you can get your SUP water-ready in minutes without frustration or air leaks.
Inflating and Deflating your SUP
Inflating your SUP correctly ensures maximum stiffness, stability, and performance on the water. Here’s everything you need to know on how to inflate an inflatable paddle board as well as how to deflate it safely and efficiently.

Step 1: Prepare Your Paddle Board
Find a flat, smooth area free of rocks, sticks, or sharp debris. Lay your board flat with the valve facing up.
Remove the valve cap and press and twist the valve stem to make sure it’s in the closed (up) position. This step prevents air from escaping later when you remove the hose.

Step 2: Inflating with a Hand Pump
-
Attach the Hose Securely
Insert the hose tip into the valve, twist, and lock it into place. It should stay connected firmly without needing support. -
Set Pump Mode
Use the highest setting—usually labeled Double Action (some pumps also have Triple Action).-
Double Action inflates on both the up and down strokes.
-
When pumping becomes difficult, switch to the lower setting for easier single-stroke inflation.
-
-
Start Pumping
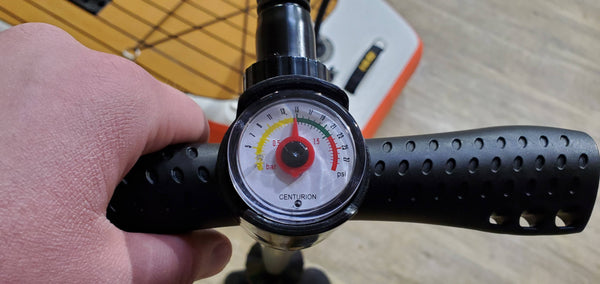
Use full, steady strokes. It’s normal for the pressure gauge not to move until you’ve reached around 7 PSI. -
Target Pressure
Inflate your board to 12–15 PSI, depending on your manufacturer’s recommendation. Glide SUP boards are built to perform best at 15 PSI for maximum rigidity. -
Remove the Hose
Once inflated, twist the hose counterclockwise to release it. A brief hiss of air is normal if your valve was closed. -
Seal the Valve Cap
Replace the cap snugly to protect the stem and prevent dust from entering. -

Step 3: Inflating with an Electric Pump
Electric pumps make setup faster and easier—ideal for paddlers who want to save energy.
-
Connect Power
Plug the pump into your car outlet or portable battery. -
Attach the Hose
Securely connect the hose to your board’s valve. -
Set Desired PSI
Choose the pressure (12–15 PSI) and start the pump. -
Automatic Inflation
The pump will fill the board and stop automatically once it reaches the selected pressure.
Don’t worry if it gets louder near the end—two-stage pumps always do during the high-pressure phase.
Step 4: How to Deflate Your SUP
Deflating your board is quick and requires almost no effort.
-
Lay the Board Flat
Remove the valve cap and press and twist the valve stem down (open position).
-
Release the Air
A strong rush of air will begin—stand clear of the valve. Let most of the air escape naturally for a minute. -
Roll to Finish
Starting at the nose, roll the board tightly toward the valve to push out remaining air. -
Clean and Store
Wipe the board dry and free of debris before placing it flat or in its carry bag. Make sure it’s fully dry before long-term storage. -

Final Thoughts on How to Inflate an Inflatable Paddle Board
Proper inflation is key to performance, rigidity, and safety on the water. Whether you prefer manual pumping or the ease of an electric pump, following the right steps ensures your SUP performs at its best every session.
If you’re ready to make setup faster and smoother, browse Glide’s electric pumps and high-performance inflatable paddle boards—built for durability, stiffness, and adventure.
FAQs
Why does air rush out when I remove the hose?
You likely left the valve pin in the open (down) position. Before inflating next time, set it closed (up) to prevent air escape. If it still leaks, the valve may need inspection or replacement.
I hear a faint hissing sound near the valve—what’s wrong?
t’s probably a slightly loose valve. Deflate your board, remove the cap, and use the valve wrench from your patch kit to tighten it ¼–½ turn clockwise.
Warning: Never tighten a valve on a fully inflated board—it can eject forcefully.
What if the hiss isn’t from the valve?
You may have a small puncture. Brush soapy water over seams—bubbles reveal leaks. Repair with your included patch kit or contact Glide for assistance.
Can I leave my SUP inflated between uses?
Yes! If you’ll paddle again soon, you can leave it inflated. Store it flat and out of sunlight to prevent warping. For long-term storage, release a few PSI and keep it flat or rolled in the bag.
How long does inflation take?
Hand pump: 15–25 minutes depending on strength and experience.
Electric pump: Around 10 minutes, hands-free.
I lost my valve cap—can I still paddle?
You can, but the cap protects the valve stem from damage. Contact Glide for a replacement as soon as possible.
Is an electric pump faster than a hand pump?
Yes. Electric pumps save time and energy, making them perfect for frequent paddlers or families. They automatically stop when your board reaches full pressure.


